Pages

.

.

Tuesday 29 October 2019

A purplicious birthday card.

Hi everyone.
Here I am again to show you my latest creation.  This is a birthday card I made for a lovely young lady.
It is Choosday again folks and you know what that means don't you?  You're right, a new challenge at Digi Choosday and a fabulously wonderful huge discount off selected digital items from the Polkadoodles store.  So why not hop over to the challenge blog and grab your code and do a wee bit of shopping.  
But, wait, hang on a minute.  Just let me tell you about my card first.
I thought I would try and show you all how versatile the world of digital stamping really is.
My card is 100% digital this time.  Yep that's right, this card is totally flat although there are elements that make it appear not to be.
Let's take a look at exactly what I did to achieve this final result shall we?
I have a digital image programme called Craft Artist and that is where I do all my manipulation of the digital images.
So, firstly I downloaded the images I wanted to use on my card.  There are three paper pieces, five digital images and two digital sentiments.  I will give you all the product details in a minute or two, just in case you want to go an spend that fabulous discount code. 😉😉

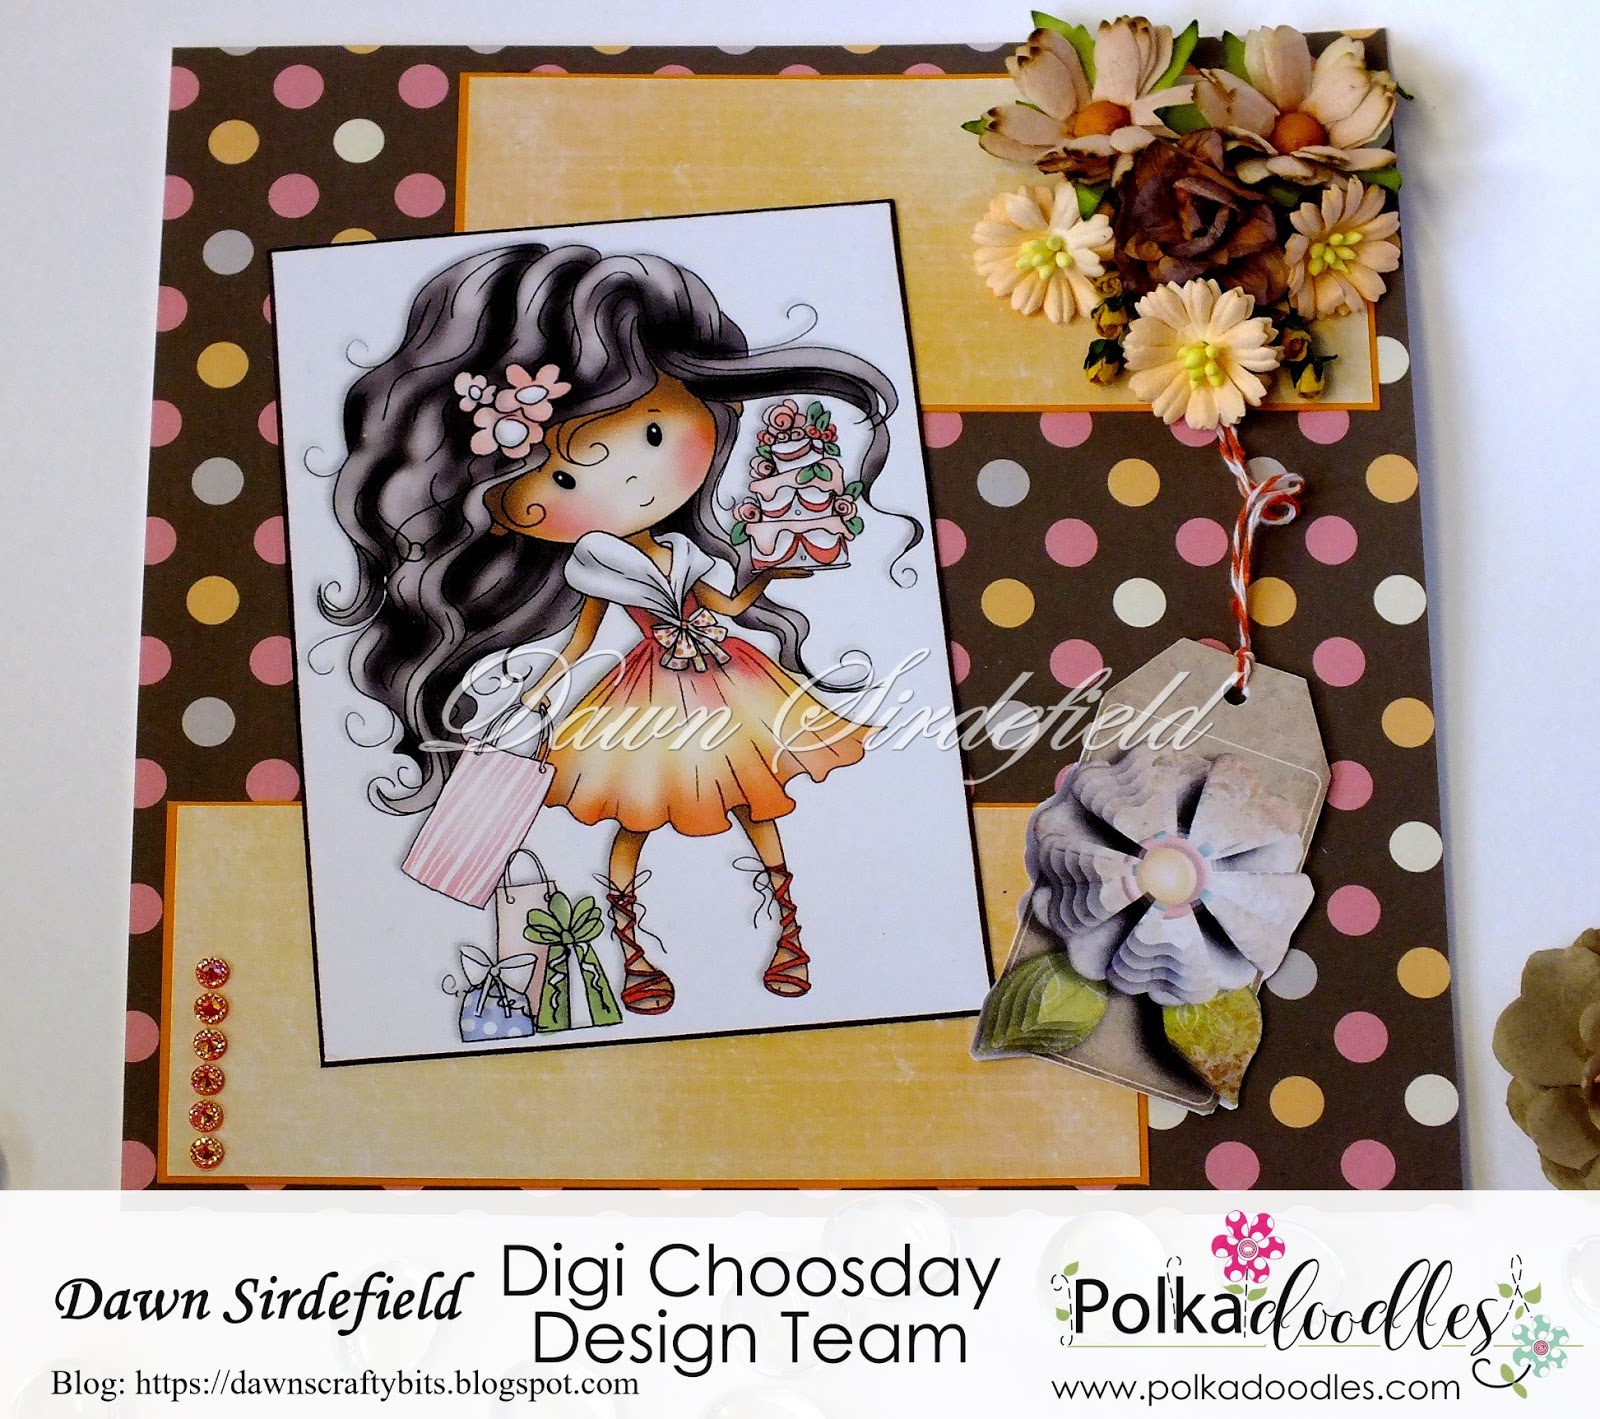
Let me show you a closer view of the finished item and you should then be able to see all the individual items.
First off I added one of the sheets of paper at the back as the base.  Then I put the other two pieces onto a black background (like matting and layering).  The programme lets you put the pieces in any order so you can move things from front to back and vice versa.
Then, on top of the lightest piece of paper I added an image of a candle.  Now this is from a Christmas set so was red with holly on.  I changed the colour in my digital programme to fit in with the rest of the card and I hid the holly by putting presents in front of the candle.  Again, the presents are from a Christmas set so the colours were all wrong for my theme so I changed them to purple.  This is great as it changes the whole image into shades of purple rather than a block of colour.
Then I added my image - the gorgeous Winnie, May Your Wishes Come True.  The only thing I did with the image was to add a shadow to it to make it look 3D and I placed her so that she looks like she is standing on the frame rather than floating in mid air.  So this is how she comes if you buy the pre-coloured image.  I wanted her to stand out against all the purple so left her in her original colours, which are of course, gorgeous.
Then I added a flower from the Horace and Boo Floral collection.  I added the image twice, grouped the two images together, (this means that you can manipulate them both at the same time in exactly the same way, making them the same size etc) and then made them look 3d decoupaged using my programme.  Again I changed the colour to match my colour scheme.  Then I copied that image twice to give me three flowers, grouped them all together and placed them in the top corner.
Then I added two sentiments.  Again I added them to white and black backgrounds to make it look as though they were matted and layered.
Printed it off and stuck it to my card base and there you go! Simples!!
So here is what I used. I have indicated which things have been edited in my digital programme just so you know.

So, if you haven't ever thought of digital stamping, why not give it a go?
Then you could come back and leave me a message with a link so I can see what you did.
Can't wait to see all your fabulous entries in our latest challenge.  You always make choosing a Top 3 really difficult. Lol
Have fun.
TTFN
Challenges:


Saturday 26 October 2019

Wicked In Mist!

Hi there.
I would like to show you my latest creation for the current challenge over at Ching Chou Kuik's Facebook group.

This fantastic image is called Wicked In Mist and you can purchase it at Ching Chou's Etsy store here.
Wicked In Mist Grey Scale Digital Stamp PRINTABLE Coloring image 0
I usually colour with my Polychromo pencils but decided to use my Copics for this one.
Some time back I coloured another of Ching Chou's witch images with the colouring classes at Kit and Clowder so I used that as my inspiration.

Now as I was colouring this image, I just knew that my colours were too bright for the look I was after.  Grrrr, what to do?
💡 - black pencil!!!
So, I went over all my colours with a black pencil and then rubbed over it with my finger.
Tadaaa!  Just what I wanted.

Then for the background I decided to use my Pan Pastels.
So I used five different colours and the colourless blender.
Then using the black pan pastel, I "drew" the trees into the background.
These are already on the image I just went over what was already there.
Lastly I matted the image onto some Kraft card and then added that to the background paper which is from a Lili of the Valley with Raspberry Road Designs pad called Father Knows Best, sadly now unavailable.
So there you go, my little piece of inspiration for the current challenge which is of course Fall/Fall Colours.

Remember also, if you enter the challenge this month, because we are celebrating our 5th Anniversary you will receive the image Dark Moon for free at the end of the challenge.

Thanks for stopping by, please let me know what you think.
I always read all my comments, (good or bad) and they do mean the world to me.

See you soon.

Challenges:

Friday 25 October 2019

Colour Crazy Challenge - Big Pumpkin!

Time for a new challenge at Colour Crazy Challenge.
As you know our challenges are always
ANYTHING GOES
However, we are a colouring challenge so we must see some hand colouring on your projects.  We don't accept digital or pre-coloured images, sorry.
Our sponsor for this challenge is the fabulous:
CHING CHOU KUIK
I am sure you know already that I ADORE Ching Chou's images.
For this challenge I chose to use
Big Pumpkin Digital Digi Stamp Instant Download / Halloween image 0
She is so cute isn't she?
So, I coloured her up using my Copics and here she is.
I have never done white hair before so I am really pleased with how this has turned out.

I decided to stick with the traditional pumpkin colours on this one and thought the cat should be grey rather than black.
I decided to add a couple of die cuts to add a bit of interest.
The sentiment is from Claritystamp, one of their fabulous word chains and the backing paper is also from Claritystamp.  This paper is such superb quality, trouble is it is so nice I never want to actually use it. Lol 


I am not really a huge lover of Halloween although I do like to see the little kiddies having a good time trick or treating.  I always have a huge bag of sweets to hand out for all the door knockers!
Mind you, I am thinking of giving it a miss this year.  We will see.

So there you go then, my little piece of inspiration for you.
I do hope you will be able to join in with our challenge and can't wait to see all your fabulous projects.

See you all soon

Challenges:

Saturday 19 October 2019

Blue Pumpkins for Halloween

Hello again
Here I am with my second inspiration project for our Halloween theme over at Ching Chou Kuik.
This image is called Blue Pumpkin and you can find it in Ching Chou Kuik's Etsy store here.
Because Pumpkins is one of the elements of the theme this month I thought I would be brave and use a pumpkin on my card this week. 
Now obviously the image is called Blue Pumpkin so I thought I would go with a more blue theme than my previous two cards.  

Now I have to be totally honest here and say this isn't how I wanted the pumpkin to turn out.  There are so many layers of colour on this pumpkin you just wouldn't believe. Lol
Still, I don't think it looks too bad does it?  Let me know what you would have done differently to make it more of a blue without the blue hitting you in the face, which was the problem I had.

In the end I just kept changing the shades of blue, yellow and green and then decided enough was enough and had to step away before my card disintegrated before my very eyes. Lol.
I guess that's the good thing about using Markers, you can keep going over colours until you are happy with the results. (well almost happy). 
The background on this image was again done by blending Pan Pastels.  I decided I wanted her to look like she was in an area with lots of leaves/reeds so just used the edge of my Sofft tool in the black pan pastel and "drew" the "leaves".  Do you know what, I kinda like the effect.  What do you think?
The two border strips were done with a Crafter's Companion embossing folder, brushed over with black ink and then I added Inka Gold to add a bit of grungy shine.
I brushed the gold roses with black ink to dull them down a bit and sponged ink on to the die cut and then rubbed some gold perfect pearls over it to match the borders. (well sort of match).

Remember, if you enter the challenge this month you will receive the fabulous image "Dark Moon" for free at the end of the challenge.

As always, I welcome all your lovely comments so please, don't go without leaving me a few words of advice/encouragement/criticism (only nice criticism though!) Lol
See you again soon with some more CCK inspiration.
TTFN
XXX

Challenges:


Tuesday 15 October 2019

All will be revealed!

Hi all
That got you didn't it?  Lol.  I am here to show you my latest project which is this cute little Reveal card.


This is my project for the new challenge over at Digi Choosday.
As you know our challenges are always Anything Goes but the Design Team always receive some extra challenges to incorporate into their projects.
This time we were tasked to make a shaped card which had a "Reveal" on it.
The other aspect we were to incorporate was Halloween/Autumn/Fall.  I instantly thought of Halloween and racked my brain for inspiration - not easy at the best of times! Lol
Well, whilst looking through my Polkadoodles images I came across some gorgeous Autumnal images which included the word Bonfire! Eureka!
Why do I never think of Bonfire night when someone mentions Autumn?  
Well, today I did.

So these images are taken from the Autumn 2015 Bundle - this is a fabulous collection of Autumnal images and was perfect for what I had in mind.
I used my Craft Artist to manipulate the images.  I made three identical sized frames and put my images inside the frames.

The first image (above) is a complete image from the bundle.

The second image is one of the many leaves in the bundle.  I just added lots of leaves in ever decreasing sizes to make my "bonfire" and then added the word Bonfire underneath which again is a standalone image in the bundle.

The third image, again a standalone image, I added the wording to, to let everyone know where and when the bonfire was going to be held - my Reveal!
The gorgeous spotty background paper is from the Winnie Sugar Sprinkles Paper Heaven 1 bundle digital download
I used one of my Martha Stewart Corner stamps to do the detail on the pull tag, which I think looks kinda sweet.

Then I added two Bare Basics wooden flat beads to finish it off.
I did think of adding some leaves to the bottom of the card, to make it look like a floor of leaves but I decided against it as I didn't want to detract from the main purpose of the card.

What do you think?  Is it too simple?
Or, does it do what it is supposed to do.
Now I have added this little video so that you can see the full "Reveal"
I'm not used to doing videos so it is a bit on the shaky side but you get the idea right? Lol


I am looking forward to seeing what you all come up with.
Remember, you will also be able to save a whopping discount on selected digital downloads today too.  Just use the special code on the Digi Choosday blog.  Let's face it, you can never have enough Polkadoodles stash right? 
TTFN
xx


Saturday 12 October 2019

All things Halloween at Ching Chou Kuik and an anniversary gift!!

Hello all
So, have you managed to join in with our new challenge over on the Facebook page or the blog yet?
No?  Well, if you love Ching Chou Kuik's images you really ought to get an entry in.
If you read to the end there is a special surprise further down!

I would like to show you my latest project which is, as the blog header suggests, very much about Halloween.
This is my inspiration post for the current Facebook challenge over at Ching Chou Kuik.  The challenge this month is centered very much around Halloween.
So, Halloween/Pumpkins/Halloween Colours
(i.e. black, orange, purple and green)
So, I am sure you can all find something that fits the bill can't you?

Although I am not a huge lover of Halloween, I have to say that Purple is my FAVOURITE colour ever.  So this challenge was right up my street.
The image I have used here is called Misty Reflections and you can find it at Ching Chou's Etsy store here.
I chose those backing papers from a pad of Claritystamp papers which you can find here.
These papers are double sided and all mix and match perfectly.

I added the flowers because I think they just finish the card off perfectly and the little gems just give the card that bit of bling.

I decided to go with my markers for this project and I am pretty pleased with how it turned out.
See the moon?  That was a technique I picked up at Alyce's colouring classes over at Kit and Clowder on Facebook, I think it gives the moon that cool textured look, don't you?
I love how this came together and the only think I would do differently if I made it again would be to change the colour on the cats.  I'm not sure whether the black really works.  Please let me know what you think.

Now, just before I go, I have some fabulous information for you all.
This challenge will be celebrating five years of Ching Chou Kuik's challenges - how fantastic is that?  Quite an achievement in today's crafting world I think, don't you?
Well, to celebrate, everyone who enters the challenge this month, both on the blog challenge and the Facebook challenge, will each receive a copy of this fabulous image, called Dark Moon.
Dark Moon  Digital Stamp Instant Download / Gothic Cat Kitten image 1
Isn't she fabulous?
So, because this is such a special occasion, I have made a card using this image too.
For this project I decided to use my Polychromo pencils.  I really do love using pencils for my colouring but the only downside is that they do tend to take a little longer, but hey I can live with that. Lol.  Now strangely enough I went for purple on her dress - which was not planned but as I said, it is my favourite colour so tends to be my go to Halloween choice. Lol

The stencil behind the image is a Claritystamp stencil which you can find here.
The background is done with pan pastels which I blended to give a more ghostish finish, if you know what I mean?
The little die cut leaf branch is one I have had in my die cut box for simply ages, I just coloured it green and then added the roses.  These were bright red so I brushed them over with some black ink to give them a darker look.  I finished off with a piece of ribbon and black bow and three little purple gems. 
These free images will all be sent out at the end of the challenge.  Doing it this way means our lovely Kym isn't on and off the computer like a jack in a box!! Lol
So there you go then.
What did you think of them?  What colours would you have used for these images?
Please leave me a comment and let me know, I do love to read your comments as they may just change the way I do something on a future project.
Thanks for stopping by, see you again soon.

TTFN
xxx

Challenges:


Tuesday 1 October 2019

A pretty Autumn birthday Card

Hello lovely peeps.
Thought I would show you this lovely little birthday card for a little girl with an Autumn birthday.

I have made this card as my DT inspiration piece for the new challenge over at Digi Choosday.  Remember, not only is it the start of a new challenge today, but there is also a mahoosive discount on selected digis too.  If you are just starting, or even half way through your Christmas Cards, now is the time to stock up on those beautiful Christmas Digital images and/or paper packs, and with a super discount you could even consider both! 
As you know our challenges at Digi Choosday are always
ANYTHING GOES
However, the DT always have little extra challenges to tackle.
This time, we had to make either a Halloween/Autumn/Fall card which incorporated a double sided hanging tag.

As soon as I saw this gorgeous Winnie Celebrations Cake Time I just knew it was the perfect image for my project.  Just look at those gorgeous colours on her dress, how could I not use her.
Now this is a pre-coloured Digital Stamp but she also comes in black and white so that you can colour her up yourself.  Mind you when they look this fabulous, why would you bother eh? Lol
So my double sided hanging tag was made using the Winnie Winterland Tags and Frames digital paper download. 
 These are fabulous because if you have a package such as Craft Artist or similar you can manipulate these images and then print them off instead of trying to make all the bits and pieces individually.
So I used two tags, a couple of flowers and leaves from the Horace & Boo Floral Foliage digital download.  I placed the flowers on to one of the tags, made it look 3D and added a drop shadow.

 On the other tag I added a sentiment from the Winnie Special Moments Quotes digital download pack and then I printed them, cut them out and glued them together.

The background paper is from the Winnie Sugar Sprinkles Paper Heaven 1 digital download and the two gorgeous orangey pieces are from the Winnie Starfish & Sandcastles 9 digital paper pack.

I used some orange twine to add my tag to the card and then finished off with some autumnal flowers and sparkly gems.
I am pretty pleased with how this turned out and the only thing I think I would change if I were to make another similar card would be to make the flower and leaves fit inside the tag shape so that the overhang didn't show on the reverse the way it does on here.  What about you?  Do you like it?  Is there anything you would do differently?
Please, if you have a moment, leave me a comment and let me know what you think.  I always love to read them.
So, there you go then, that's me for today.
Looking forward to seeing what you all come up with for the challenge.
See you soon
TTFN 
xx